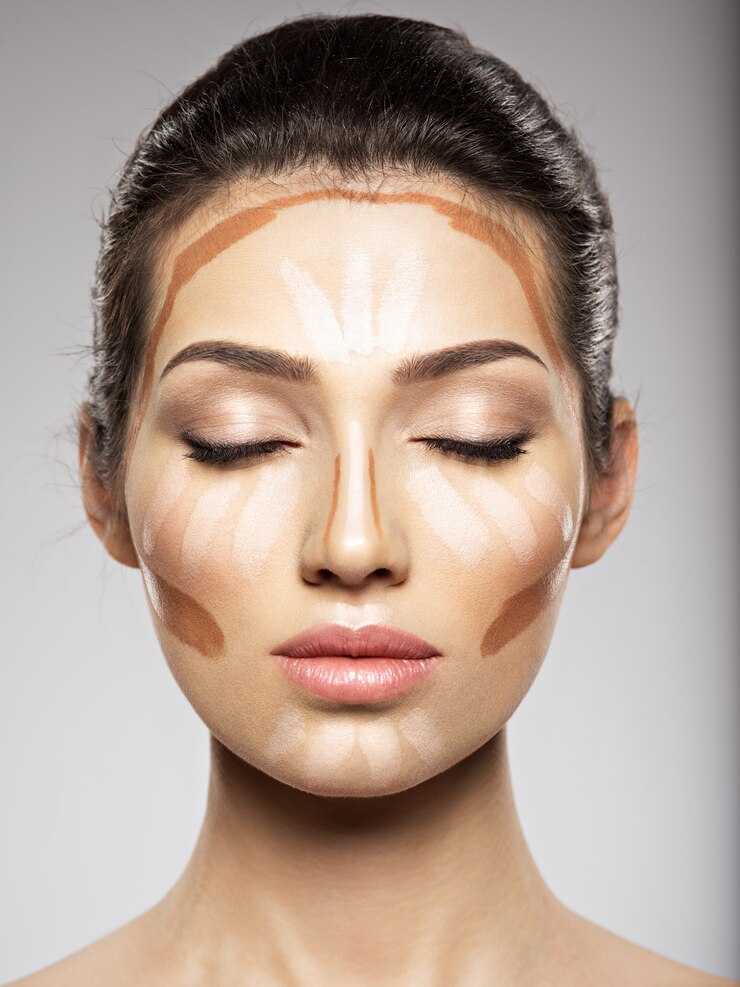
Contouring has become a makeup phenomenon, transforming faces with sculpted cheekbones, a defined jawline, and a radiant complexion. While it may seem like a skill reserved for makeup artists, anyone can master the art of contouring with the right techniques and a bit of practice. Here’s a step-by-step guide to help beginners achieve a beautifully contoured look.
Step 1: Gather Your Tools and Products
Before diving into contouring, ensure you have the right tools and products on hand. You’ll need:
- Foundation
- Concealer
- Contouring products (contour cream, powder, or stick)
- Highlighter
- Makeup brushes or sponges (a blending sponge and brushes for contouring)
Step 2: Start with a Clean Canvas
Begin with a clean and moisturized face. Apply your regular foundation to even out your skin tone. Make sure your foundation matches your skin color to avoid an unnatural finish.
Step 3: Identify Key Contour Areas
Understanding your face’s structure is crucial for effective contouring. The key areas to contour include:
- Cheekbones
- Jawline
- Nose
- Forehead
- Temples
Step 4: Choose the Right Contour Products
Contour products come in various forms, including creams, powders, and sticks. For beginners, powders are often easier to work with. Choose a contour shade that is a few shades darker than your natural skin tone and a highlighter that is a few shades lighter.
Step 5: Contour the Cheekbones
Use an angled contour brush to apply contour powder along the hollows of your cheekbones. Start near your ears and blend towards the center of your cheeks. Make sure to blend well to avoid harsh lines.
Step 6: Define the Jawline
Apply contour along your jawline to create definition. Blend the product downward toward your neck to avoid a visible line. This helps to sculpt and enhance your jawline.
Step 7: Contour the Nose
For nose contouring, use a smaller brush to apply contour on the sides of your nose. Blend the product well to create a subtle, slimming effect. You can also highlight the bridge of your nose to add dimension.
Step 8: Contour the Forehead and Temples
Apply contour along your hairline to reduce the appearance of a large forehead. Blend the contour product into your hairline. You can also contour the temples for added definition.
Step 9: Highlight Key Areas
Apply a highlighter to areas where light naturally hits your face. This includes the tops of your cheekbones, the bridge of your nose, the center of your forehead, and your cupid’s bow. Blend the highlighter gently for a seamless finish.
Step 10: Blend, Blend, Blend
The key to successful contouring is seamless blending. Use a clean blending sponge or brush to ensure there are no harsh lines or visible product. Blend until the contour and highlight seamlessly merge with your foundation.
Step 11: Set with Powder
To set your contour and ensure long-lasting wear, lightly dust your face with a translucent setting powder. This helps prevent the product from shifting throughout the day.
Step 12: Practice and Experiment
Contouring is an art that improves with practice. Experiment with different techniques and product formulations to find what works best for your face shape and preferences. Remember, less is often more, especially for a natural look.
Contouring is a versatile makeup technique that enhances your natural features. With the right tools, products, and a bit of practice, beginners can master the art of contouring and achieve a beautifully sculpted and radiant look.


